How to stop lateral movement through your networks
Kieri Solutions implements deny-by-default firewalls and network segmentation for government, small, and medium businesses. This is a specialized skill which requires very strong knowledge of a broad range of platforms as well as network security. If you would like to chat about your network hardening and compliance project, email us at info@kieri.com
If you want to prevent damage from hackers and ransomware attacks, you need to perform network hardening and segmentation.
NIST security publications encourage ‘defense in depth’ as a best practice. They recommend creating multiple network segments with strong firewalls in between. The diagram above shows a cost effective segmentation design that is appropriate for medium businesses.
NIST control 3.13.6 Compliance
NIST and DFARs compliance projects require implementation of control # 3.13.6: Deny network communications traffic by default and allow network communications traffic by exception (i.e., deny all, permit by exception).
This is one of the most difficult cybersecurity controls to comply with. Almost all businesses have wide open (allow all) network communications, except for the external firewall. Open communication places the business at risk of data breach, intellectual property theft, insider threat, and extensive damage from malware attacks. Attempts to secure your network by denying traffic by default will often cause system outages unless you have expert assistance.
By separating your network into multiple segments, you limit the damage that could occur from cyber-security threats.
For example, many ransomware attacks will spread to every vulnerable computer in the same network segment as the original compromised computer. Rather than have your workstations AND server data destroyed, wouldn’t it be better to limit the damage to just a few workstations?
Several IT Cybersecurity compliance frameworks require the use of De-Militarized Zones (DMZ) and Secure Sensitive Networks. For example, if your business processes credit cards, the PCI compliance program will require that you separate credit card databases from externally-facing servers.
Deny-by-default DMZ Firewall
A secure DMZ is the first improvement you should consider. It is also an important step for PCI compliance. Your externally-facing servers are at high risk from Internet-based attacks. Once an internal server is penetrated and taken over by a hacker, they “pivot” to attack the rest of your network. Any penetration tester will tell you that once they are inside the network, the hard work is done.
Examples of servers that should be in a DMZ:
Outlook Web Access and Outlook direct (Exchange Client Access Server)
Remote access (Citrix terminal servers and Remote Desktop for users or IT staff)
Application servers that transfer data to-or-from other companies
Proxy servers
Spam filters (Barracudas etc)
Electronic faxing
Any web server that can be reached from outside
Servers that synchronize with “the cloud” or other businesses
How does a DMZ deny-by-default policy work?
The outside firewall (between your company and the Internet) should already be using deny-by-default policies, at least for traffic coming in from the Internet. We will review this to see if it is possible to tighten up any of the policies. For example, many companies allow remote access to a terminal server from anywhere on the Internet. This is extremely risky. We would recommend reducing this remote access to specific network addresses (such as vendor networks) and using VPNs for traveling employees.
Where it makes sense, we also want to restrict outbound communication through your firewall. Once a hacker has accessed your sensitive information, they generally want to make a personal copy of it. They do this by sending it through your firewall. Blocking unusual traffic makes it harder for the bad guys to perform a data breach.
Creating a DMZ adds a second firewall layer between your externally-facing servers and your internal network. This restricts the network traffic that moves between DMZ servers and the rest of your network.
How is a DMZ with strong firewall implemented?
Very carefully. This is not a fast process. The last time we created a DMZ for a medium sized business (500m/year revenue and 10 servers inside the DMZ), it took three weeks, about 100 billable hours, and a two-month on call period to complete. But we researched and tested everything thoroughly as we went, which minimized user impact. If anyone tells you that this is a fast or easy process, they are probably leaving allow-all rules between the segments, which defeats the entire purpose.
Research and planning phase: Carefully review each server, and each server that they communicate with, to identify normal communication channels and port usage. Create written back-out plans so that if business is impacted, we can flip a switch and get the servers communicating until we find a solution.
Establish DMZ network: Migrate server networking to the DMZ. Other servers will need to update their connection information for the migrated server. Test thoroughly.
Enforce deny-by-default policies: Create a firewall policy set for each DMZ server which allows only necessary communication between the outside and the inside. Test thoroughly (this includes restarting services and servers to trigger startup communications).
Monitoring and responsiveness: Engineer is on-call for at least a month to assist with infrequent situations such as month-end accounting jobs.
Documentation and training: Provide configuration management information, firewall and switch configs, and train your staff to manage the new systems.
Sensitive systems internal layer
The next segmentation improvement is to set up a sensitive systems internal layer. This network layer is for the most critical systems: high value targets such as your customer database, proprietary designs, and backups. Core IT systems such as VMware, switch, and firewall management can also be protected here.
How is internal segmentation implemented?
The process is essentially the same as the DMZ, but for the most sensitive systems rather than the least sensitive systems. Servers are only good candidates for this if they have limited communications. For example, an ideal database server would only have one communication channel open – between it and an application server.
A server that is accessed on multiple ports by regular users (such as a file server or directory server) cannot be fully secured, so it should stay on the internal network.
Internet of Things – a developing risk
The problem with IoT is that most of the devices are programmed to “call home” to their vendor. Depending on the device, they might download updates automatically, or even be remotely managed by the vendor. If the vendor is compromised, each of their devices could be a source of infection to your network.
For example, even if you have a firewall that protects you against inbound threats, your security camera probably opens an outbound connection to its vendor company each day. Normally this is a good thing – it lets the vendor install patches or centrally manage the device. But if something goes wrong at the vendor, the device could serve as an access point into the inside of your network.
In the last two years, the Internet of Things (IoT) has exploded. Your business might have some of these…
Smart TVs
VOIP phones
Security cameras
Personal assistant devices (Alexas, Siri)
Printers
Environmental systems
Scanners
Some “smart” firewalls such as FortiNet
Smart backup devices such as Datto
Network Attached Storage (NAS) such as Synology
Tablets
Battery back-up systems
“Smart” lights
There aren’t established industry best practices for IoT devices yet, but we here at Kieri Solutions feel that they should be strongly separated from the rest of the network. Setting up an separate network just for IoT devices is an easy way to do this for your business.
Do I need to buy multiple firewalls or switches?
Most of the time, if you are working with business-quality firewalls and switches, we do not need to buy any new hardware. Most professional firewalls / routers such as Cisco, Sonicwall, FortiNet, and WatchGuard have built-in capability for multiple network segments. Most professional switches have VLAN capability, which we can configure for DMZ and sensitive network segments.
What is the next step?
Please consider Kieri Solutions for your network hardening and segmentation project. Our employees are trusted by the US military, universities, large, medium, and small corporations. We love after-hours work, change management, configuration management, and testing because they reduce risk and keep users working.
Kieri Solutions is a cybersecurity and IT consulting company serving businesses in Maryland and Northern DC. Silver Spring, Rockville, Gaithersburg, Frederick, Baltimore, Columbia and other nearby cities in MD.
We also assist companies throughout the USA for remote-work projects such as virtualization, Azure, and security policy writing.
Tips, tricks, and missing steps for the VMWare upgrade
Having done several small / medium business upgrades from vCenter and ESXi 5.5 to 6.0 and 6.5 and 6.7, I wanted to share some best practices and lessons learned with the IT community.
About 2-4 hours during the actual upgrade process. Figure one hour to deploy the appliance (no risk, original vCenter is unchanged), then another hour and a half to replace your existing appliance (your original vCenter is shut down). VMWare is very good about this process and will perform many system checks before shutting down your original vCenter. If something goes wrong at this stage, remember you can shut down (power off) the new vCenter and then start your old vCenter and it should recover.
Don’t forget the preliminary research, system checks, and preparation is another 4 hours for a small or medium business (this includes research for vSphere upgrades).
1-2 hours of the preparation is getting the images downloaded, either to your burned DVD or directly from the VMWare website.
——————————–
What is the risk of downtime while upgrading vCenter?
Good news: For small and medium businesses, there is almost no chance of customer impact while upgrading vCenter. Just don’t plan to do other management tasks at the same time. Remember that the hosts will keep running the VMs, the storage, and the virtual networking unchanged even if they can’t reach vCenter. DRS, HA and vMotion will not be available, so you won’t have normal redundancy.
As long as you complete your upgrade in a reasonable amount of time (one evening), you should be fine. What are the odds a host crashes in that 2-4 hour period? Generally extremely low (less than 0.1%) unless you have more than 5 hosts.
If you have 100+ hosts, then your odds of a server randomly crashing during the upgrade gets closer to 5%. But in that case, you should have a team of experts on the job, so you shouldn’t need much help from this lowly blogger <grin>.
——————————–
Can I upgrade vCenter and vSphere remotely?
You can perform this entire process (vCenter and ESX host upgrades) 100% remotely. Make sure you have a plan for what to do if a host doesn’t come back after rebooting. Ideally, you have an Integrated Lights-Out (iLO) module on your servers, which will allow you to restart them or power on/off remotely.
——————————–
Research before migrating or upgrading vCenter
Make sure you have deep-dived into the existing vCenter appliance and each host before starting.
Make sure to get the following configurations:
Existing vCenter IP , verify root username and password (see next topic)
Network basics (internal domain name, subnet mask, gateway, two DNS servers)
Time provider (NTP). Make sure this matches the NTP source your hosts are using! This is a good time to standardize it across your environment.
A ‘free’ IP address on the same subnet as your existing vCenter server. Will be used for a few minutes during the upgrade.
Configure your DNS servers to have a fully-qualified name for vCenter (the old vCenter IP and your new vCenter’s name). For example: vcenter01.company.com . Make sure you can resolve it before you start the upgrade. The vCenter install (particularly new installs) will bomb out if you don’t have good DNS.
——————————–
When you upgrade to vCenter or VMWare 6x, your vSphere Client (the program) will stop working! There is no client download on the website! How can you connect?
History: vCenter and vSphere 6x are designed to be managed with your web browser, using flash. VMware did this because there are all sorts of really niche configuration options that almost no-one uses. Adding the niche options to a website is easy. Adding them to the vSphere client is not. In version 5x, VMware put only basic functionality in the vSphere client and started offering niche options in the management website ( https://hostname:9443/vsphere-client ). In version 6x, VMware got sick of updating both the website and the vSphere client, so they stopped offering the vSphere client program. Nooo!
So now that you’ve upgraded to 6x, how can you connect and manage your virtual environment?
Using Chrome, IE, or Firefox, make sure you have Flash installed. https://get.adobe.com/flashplayer/ (Personally, I use Chrome, so the rest of the instructions will match Chrome.)
Navigate to https://vcenter_server_fqdn/vsphere-client
or for a host.. https://host_ip_address_or_fqdn/vsphere-client
Didn’t connect? Make sure you have a DNS entry for your vCenter server. This is a requirement for 6x
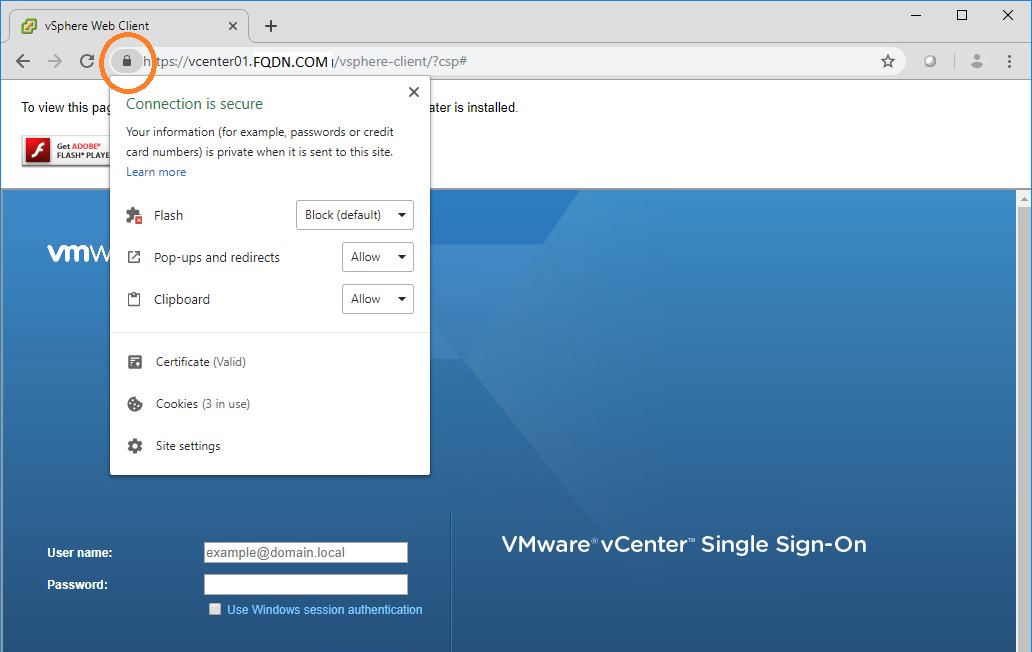
Now you probably have a warning “To view this page ensure that Adobe Flash Player version x or greater is installed”. But you already installed Flash Player! What the heck, Chrome?
You need to enable Flash each time you open the website for the day. Look for the lock icon in the address bar. Click on it and you will see Flash listed as blocked. Change it to Allow.
You will be prompted to Reload the page. Do so. Now flash will work and you can log on. Default username for vCenter “vSphere Web Client”: administrator@vsphere.local . Default username for vSphere (individual host ESXi servers): root. In both cases, you should have been prompted to set the password during install or upgrade.
——————————–
What about opening the Console to a virtual machine?
The console still works, but it now requires you to download a separate program Here is how to open console in 6.0 6.5 and 6.7.
You need to download the “VMware Remote Console” from the VMware website. It can be reached by … Downloads > vSphere > “Drivers & Tools” tab > VMware Remote Console.
Expand VMware Remote Console then click Go To Downloads.
You will see separate installers for Windows (all Windows variants), Macintosh, and Linux systems.
You will need to log on with a VMware account – if you don’t have one already, just go ahead and register for the free account.
Download and install the remote console on your computer. No reboot necessary.
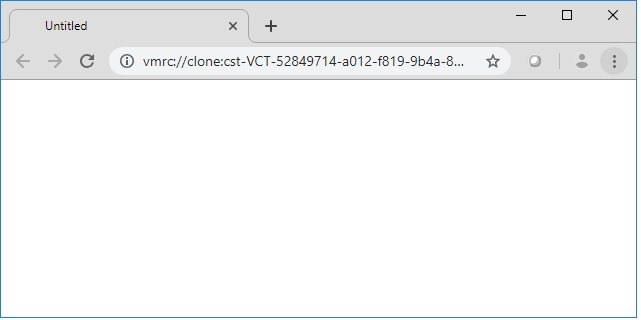
Next time you select “Open Console” from the vSphere / vCenter web client, it should prompt you to open the link with a program. Select the VMRC (Vmware Remote Console).
Your VMRC console should now open and you can interact with the desktop.
When you click Open Console in 6x, a new webpage will open. It attempts to start the VMware Remote Console program and connect it to the guest VM. It is safe to close this window as soon as VMRC is started.
In 2017 and early 2018, the remote console was terrible with jumpy mouse, mouse disappearing, or offset mouse issues. The remote console has since been updated and works very well with all the operating systems I’ve tried (CentOS, Ubuntu, RedHat, Windows Server 2012, Server 2016, etc.
Installing VMware tools on the guest VM will normally help with sync issues.
Remember, if your mouse or keyboard get ‘stuck” in the console session (normally this only happens with pre-boot environments), just press left-CTRL and left-ALT at the same time.
——————————–
Problem: Can’t log onto the old 5.5 vCenter appliance
Symptom: You are pretty sure you know the root password, but it is not working on the web GUI. ( https://vCenterIP:5480 ) It says wrong password.
Symptom: The 5.5 vCenter appliance was built more than a year ago.
Fix: Connect to vCenter using SSH
(I recommend using the Putty SSH application which is available at this link). After connecting, when you enter ‘root’ and the correct password (default is ‘vmware’ but you’ve probably changed it), you will be told that the password is expired. Change the password using the SSH dialogue and now you can log on to the web GUI.
Cause: When you build a vCenter appliance (5.5, 6.0, or 6.5 or 6.7), by default, the system expires the root account after one year. I recommend un-checking this immediately whenever you build vCenter. If you want to change the root password periodically, you can still do it, but this way your department won’t get locked out.
——————————–
How to upgrade vCenter from 5.5 to 6.0 or 6.5
I personally recommend deploying 6.5 vCenter appliances (rather than deploying vCenter onto a Windows server).
The first step to upgrading is to perform a snapshot of your vCenter virtual machine. If you quiesce guest memory and something goes wrong during the upgrade, you can revert to the snapshot and everything will be working again within 5 minutes. This truly can be depended upon. Make a reminder to remove the snapshot after everything is stable.
Stage the upgrade
Note: You will need a valid VMware account. These steps are performed on a Windows 10 administrative workstation.
Adjust the version selection as necessary. Make sure that your vCenter is the same or HIGHER version as your ESXi servers.
Find the VMware vCenter Server Appliance , file type: iso ( about 3-4 GB) and download it.
Mount the ISO by right-click, Open With, Windows Explorer.
The files will appear in your DVD drive letter in Windows Explorer.
Navigate to \vcsa-ui-installer\win32\installer.exe and start it
vCenter appliance installer will display. Click Upgrade.
Here is a helpful video that describes pre-requisites and has step-by-step instructions to perform the upgrade. Text steps continue below.
vCenter Appliance Upgrade Stage 1
Upgrade Stage 1: Deploy Appliance – Introduction displays. Click Next
Upgrade Stage 1: Deploy Appliance – License agreement displays. If you want to proceed, click Accept and Next.
Upgrade Stage 1: Deploy Appliance – Source Appliance displays. Identify your Source Appliance (your existing vCenter 5.5 server) and provide credentials to access it. The default HTTPS port 443 is correct unless your environment has changed it (this is unlikely). The SSO User Name is normally administrator@vsphere.local , but this could be any full administrator account. Appliance (OS) root password refers to the root password for the vCenter 5.5 appliance. The root account can be tested by opening website to the vCenter 5.5 server https://vCenterIP:5480 or connect via SSH to the server.
You have a choice to specify either the ESXi host or vCenter server that manages the source appliance. It is recommended to specify the ESXi host, not the vCenter server, in that box. You can specify by IP or DNS (IP is less likely to have issues).
Click Next
Upgrade Stage 1: Deploy Appliance – .Specify deployment type displays – Embedded Platform Services Controller is appropriate for environments with 1-20 vSphere ESXi servers. If you aren’t sure, and you have less than 20 hosts, go for Embedded. If you have more than that, do some research to see what is best for your environment.
Upgrade Stage 1: Deploy Appliance – Appliance deployment target displays. Enter the ESXi host IP address or DNS that you want to host the new vCenter server. This can be the same ESXi host as is already hosting (make sure you have at least 10 GB of RAM available on it), or a different one. You will need to specify the username and password for the ESXi host.
Upgrade Stage 1: Deploy Appliance – Select folder displays. You can put the new vCenter server into a logical folder in your environment.
Upgrade Stage 1: Deploy Appliance – Select Compute Resource displays. You can choose which ESXi server runs the new vCenter server.
Upgrade Stage 1: Deploy Appliance – Set up target appliance VM displays. You can assign a name to the new vCenter server and give it a root password. Take note of this username and password – you will need it to manage the new vCenter server in the future.
Upgrade Stage 1: Deploy Appliance – Select deployment size displays. Look up the number of VMs you are running in the table, and pick your vCenter size based on it. Most environments qualify for Tiny, with less than 10 hosts.
Upgrade Stage 1: Deploy Appliance – Select datastore displays. Pick a datastore that has space to hold the server size you picked in the last step (Tiny = at least 250 GB free).
Upgrade Stage 1: Deploy Appliance – Configure Network Settings displays. Pick the VM network from the list that is the same as your old vCenter server and assign a temporary IP address on the same subnet as the old vCenter server. Your admin workstation needs to be able to communicate with this IP address as well.
Upgrade Stage 1: Deploy Appliance – Ready to complete stage 1 displays. Click Finish to run the deployment. It should complete Stage 1 in about 30 minutes or less.
Click Continue to proceed to Stage 2
Note: If you get an error communicating with the new vCenter at this point, your workstation is having trouble reaching the new server over the network. Did you assign the VM to the correct virtual switch? Did you give it an IP address that can route on that subnet?
Stage 2 of the vCenter Appliance Upgrade
Upgrade Stage 2: Introduction displays. Click Next
Upgrade Stage 2: Pre-upgrade check result displays. Warnings may display, depending on how your vCenter 5.5 server is configured. Recommended resolutions will also display. You can close the results after reading through them.
Upgrade Stage 2: Select upgrade data displays. I recommend copying everything from the source to the new vCenter, but if you are worried about space, just move the configuration. The events, tasks, and performance metrics are just for audit purposes.
Upgrade Stage 2: Configure CEIP displays. Depending on your company policy, join or do not join VMware’s Customer Experience Improvement Program. Most security conscious businesses or government agencies will not join the CEIP.
Upgrade Stage 2: Ready to complete displays. Click Finish when ready.
Data transfer and setup runs – this will take up to 45 minutes normally. When finished, you can click the Close button to finish the wizard.
Now you can log on to the new vCenter and check it out! https://vCenter_IPaddress/vsphere-client
——————————–
Can I install vCenter without DNS?
YES.
Check out this blog I wrote on how I installed vCenter 6.7 without DNS.
What if you have a Windows-based vCenter appliance?
Especially if you have update manager installed? This can get ugly. The basic steps are to install the vCenter update then install the Update Manager update. But, occasionally, vCenter will start acting really buggy and the client crashes. The good news is that you can roll back to the latest snapshot of vCenter (you did snapshot it with quiesce memory before the upgrade , right?) and it will go back to normal, the bad news is that you probably will need to rebuild vCenter or call VMware if you have a problem.
——————————–
Upgrade fails, need to rebuild vCenter
If your vCenter deployment is a typical medium or small business size, re-building your vCenter from scratch is actually faster than troubleshooting it, and doesn’t involve downtime. 90% of the configuration is held on the hosts, including datastores, virtual switches, and VMs. Make sure to spend 10 minutes looking at your old vCenter and screenshot the following:
License keys
User accounts and any custom permissions
Network settings for vCenter server
NTP settings
HA and DRS settings
CPU compatiblity settings
Keep-away and custom rules settings
If you use distributed switches or other advanced items like NSX and vSAN, rebuild at your own risk. Make sure you’ve really captured the configuration steps before you proceed.
Once you have the config’s captured, just turn off your old vCenter and build a new appliance from scratch. Set up your clusters and licensing, then add each host. Everything should come in correctly. Make sure to re-connect your backup programs to the new vCenter afterward.
Hint: You can install vCenter at 6x directly. No need to install a 5.5 version.
——————————–
How to set password policy so that you don’t get locked out
One of the first things you should do is change the password policy on your vCenter so that the accounts do not expire after 90 days. If you require a password to be complex (meaning 14+ characters long), you shouldn’t need to expire it for years and years.
To view or change the policy:
Log on to vCenter https://vCenterName.domain.etc/vsphere-client with administrator@vsphere.local
From the Home menu (icon looks like a house), select Administration
Under Single Sign On, select Configuration
Select Policies, then Password Policy, then click edit.
To set passwords to never expire, change the Maximum lifetime to 0.
I also recommend increasing the maximum length to 16, reducing the character requirements to 1 each, and limiting the identical adjacent characters to 3.
Click Save to save changes. These changes are global to all _______@vsphere.local accounts.
——————————–
vSphere ESXi upgrades from 5.5 to 6.5 or 6.7
Before you upgrade your ESX hosts, take a quick read through the rest of the topics below. There are lots of good tips and things to avoid.
——————————–
How long does it take to upgrade an ESXi host?
Do you have a shared SAN with 10gbps storage networking??? It is normally about 1.5 hours per host to perform the upgrade.
Are your VMs stored on the local hard drive of the ESXi hosts? It will take # minutes to vMotion the VMs to another host, + 1 hour. In many cases, it is more efficient to power off all VMs and perform the upgrade, then power the VMs back on, if you are using local storage.
You can save time by upgrading multiple hosts at once. This of course requires either powering off the guests or having enough extra resources to host them on the other servers.
Here is the time breakdown I use:
10 minutes: vMotion all guests off the host (this assumes you have fast shared storage). Or power-off the guests.
2 minutes: Put the host into maintenance mode
5 minutes: Enable SSH in services. SSH into the host and perform pre-upgrade scripts.
30 minutes: Download and install the latest image from VMware repository (requires Internet)
15 minutes: Reboot the host and wait for the server to load back into the ESXi operating system fully.
20 minutes: Apply SPECRTRE / MELTDOWN setting and reboot again ( only if you haven’t patched in a while).
5 minutes. Disable SSH in services. Take the host out of maintenance mode.
10 minutes: vMotion a non-critical guest to the host and test functionality.
10 minutes: Finish vMotioning other guests to the host (or power on the guests).
——————————–
What is the risk of downtime for ESXi upgrades?
The first question is: Are all your hosts running the same model of hardware?
If YES… then your risk is almost nil.
If NO… your hosts are running different hardware models (such as a Dell R710 and a HP DL360 gen8 and a HP DL360 gen9), then your risk of downtime or customer impact is pretty high. Read through the topic below, “CPU Generation Compatibility Levels” before you continue.
Next question: Do you have enough RAM and disk space to run all your VMs on (HOSTS – 1) ?
Figure this out ahead of time. Many companies have a few high-resource VMs such as database servers, which take up all or most of the resources on a host. Plan how you will migrate the VMs around so that all the VMs will fit onto your other servers. Note: You CAN overallocate RAM on ESXi hosts. They will page the less-used memory to disk. This normally won’t hurt performance much as long as you don’t over-allocate too many resources. Here is a (very) technical article about overallocating memory and CPU on VMware: https://labs.vmware.com/vmtj/memory-overcommitment-in-the-esx-server
If you properly migrate your VMs off each host, putting it into maintenance mode, before upgrade, you should be good. I still recommend doing this portion after-hours so that you minimize impact from vMotion and have the maximum amount of redundancy during the workday in case one of your hosts randomly fails.
——————————–
Problem: When I try to vMotion a guest VM, the option is grayed out?
Normally this issue is because the VM is changing in some way. For example, it might be migrating somewhere already, or you just modified the hardware settings and it is still saving, or you just powered it on, etc. Another possibility is that your Veeam is performing a backup of that VM.
If Veeam backup is occurring (you can tell by looking at the current Snapshots), wait for the Veeam backup to complete, or cancel it.
If a fast task like changing settings is running, wait for it to complete.
If you can’t find the cause, try shutting down the VM and powering it back on. Sometimes that clears the issue. Obviously not the ideal answer.
——————————–
How to upgrade ESXi hosts using command line remotely
For this procedure, you WILL need Internet access from the host. If you have a decent business ISP, it should take less than 20 minutes to download the update.
1. vMotion or power-off all VMs off the host. Note: you may need to disable automatic load balancing in your cluster if the VMs are automatically migrated back.
2. Put the host into Maintenance Mode
3. Start the SSH service on the host ( Configuration > Security Profile > Services > Edit )
4. SSH to the host ( I use the Putty program which is freely available on the internet)
5. Log on as root
6. Perform this command to enable downloads from the VMware Internet repository”
esxcli network firewall ruleset set -e true -r httpClient
7. Determine which version of ESXi you want to update to.
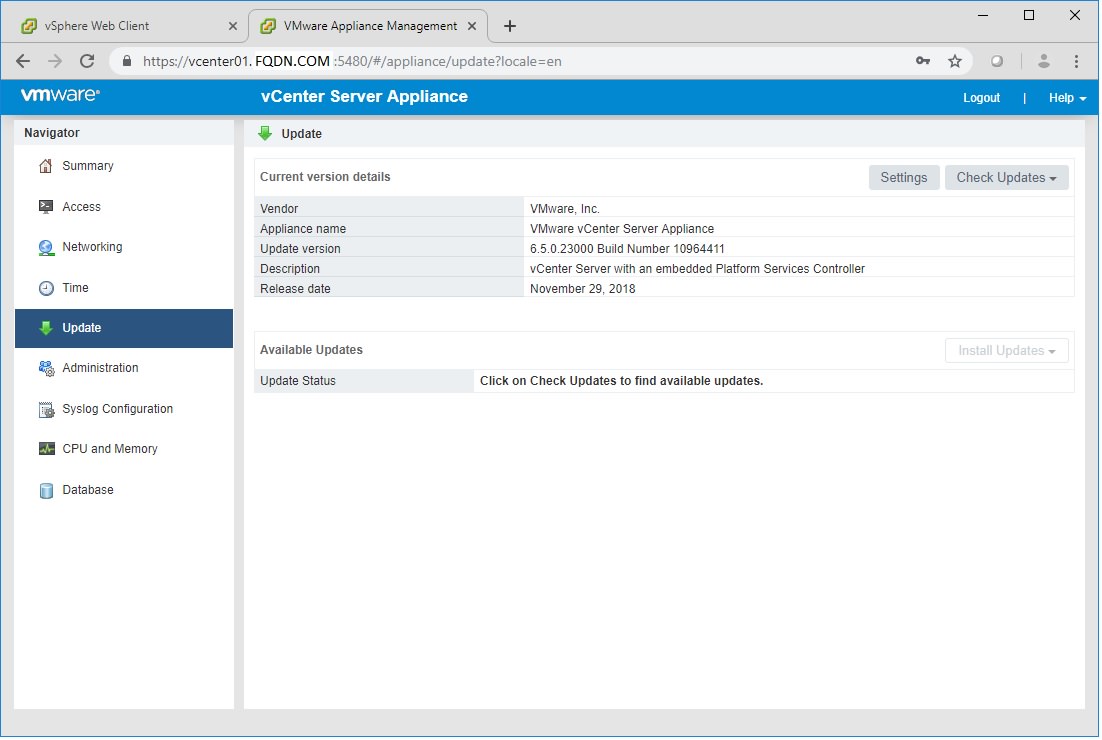
IMPORTANT: Never update your ESXi version higher than your vCenter version!! If you do, your vCenter will disconnect the hosts!!!
For example: When I check my vCenter version in the Appliance website ( https://vcenter.fqdn.com:5480 , update tab), I see my vCenter is version “6.5.0.23000 Build Number 10964411” with a Release date of November 29, 2018.
I look up the VMware patch tableand decide I want to download ESXi 6.5 EP 11 which was released November 9, 2018 and has a slightly lower build number than my vCenter server.
Version
Release Name
Release Date
Build Number
ESXi 6.5 EP 11
ESXi650-201811001
11/09/2018
10719125
Perform this command in SSH to see what versions of ESXi are available from the VMware Internet Repository:
Review the list for the version you want. Copy the package name to your clipboard. The package name will look like ESXi-6.#.#-########-standard
When I perform the query in SSH, I see packages that match the release name:
ESXi-6.5.0-20170304101-standard VMware, Inc. PartnerSupported ESXi-6.5.0-20171201001s-standard VMware, Inc. PartnerSupported ESXi-6.5.0-20170304101-no-tools VMware, Inc. PartnerSupported ESXi-6.5.0-20181101001s-standard VMware, Inc. PartnerSupported ESXi-6.5.0-20180604001-no-tools VMware, Inc. PartnerSupported ESXi-6.5.0-20180502001-no-tools VMware, Inc. PartnerSupported ESXi-6.5.0-20171204001-no-tools VMware, Inc. PartnerSupported ESXi-6.5.0-20170304001-standard VMware, Inc. PartnerSupported ESXi-6.5.0-20181104001-no-tools VMware, Inc. PartnerSupported ESXi-6.5.0-4564106-no-tools VMware, Inc. PartnerSupported ESXi-6.5.0-20181101001s-no-tools VMware, Inc. PartnerSupported ESXi-6.5.0-20181103001-no-tools VMware, Inc. PartnerSupported ESXi-6.5.0-20180501001s-standard VMware, Inc. PartnerSupported ESXi-6.5.0-20170304001-no-tools VMware, Inc. PartnerSupported
Since I want the full package including latest VMWare tools, I pick the package named “-standard”.
8. I then run the UPDATE command, adding the package name to it.
After about 5 minutes (depending on your internet connection), you should get a successful message.
Update Result Message: The update completed successfully, but the system needs to be rebooted for the changes to be effective. Reboot Required: true VIBs Installed: VMware_bootbank_esx-base_6.5.0-2.71.10868328,………,………,………,………,………,………,………,………,………
9. Type reboot in SSH to reboot your host.
10. Wait for the reboot to finish. Generally, I just wait for vCenter to show that the host is back online.
11. SSH back into the host, logging on as root. Note: If SSH doesn’t connect, you may need to re-start the SSH service in Security Profile.
12. Disable downloads from the VMware Internet repository by running this command:
esxcli network firewall ruleset set -e false -r httpClient
13. Take the host out of Maintenance Mode
14. vMotion or power-on a non-critical guest VM to this upgraded host.
15. Test functionality of the non-critical VM (especially check the ability to ping it, which is a good all-around test of host, network, and VM)
16. vMotion or power-on the other VMs to the upgraded host.
17. Stop the SSH service on the host (Configuration > Security Profile > Services > Edit )
18. Continue upgrading other hosts.
If you need more information, here is a longer guide for upgrading ESX 5.5 to 6.x using command line by Deflounder.
This is a big concern because if you don’t avoid it in advance, you will have to shut down some VMs in order to complete the ESXi hosts upgrade.
If you have more than one model of server, deep dive on this BEFORE you start upgrading ANY hosts.
Symptoms
You have older hosts mixed in with newer servers.
After upgrading a host to vSphere 6.0 or 6.5, you cannot vMotion your VMs to it. “The virtual machine requires hardware features that are unsupported or disabled on the target host. General incompatibilities. If possible, use a cluster with Enhanced vMotion Compatibility (EVC) enabed, see KB article 1003212.“
Root Cause
vCenter 5.5 seems to handle CPU compatibility without any configuration steps. Later versions need to be configured for this before you turn up hosts.
In vCenter 6.0 and 6.5 and 6.7 , you need to set up a Cluster object and put your hosts into it in order for Enhanced vMotion Compatibility to work across CPU generations. But you can’t do this while your host has any VMs running. If you upgrade then move your VMs onto the host without setting up the cluster object, you will have issues vMotioning the VMs to other hosts later.
Fix: Set up cluster in vCenter, configure CPU compatibility levels to the lowest common denominator, and add your newest host to it early.
After upgrading vCenter, but before upgrading hosts, create a cluster object (right-click the datacenter, New Cluster)
After naming the cluster, right-click it and select Settings.
Select the “VMware EVC” tab in settings. Enable it, and select the lowest (oldest) CPU generation for all of your hosts.
Starting with your newest hosts (the highest generation), move them into this cluster after upgrade but before migrating VMs back onto them.
For example, I will upgrade ESX05 first because it has the highest CPU generation.
(I have already upgraded vCenter to 6.5)
Create a cluster object and configure CPU compatibility at the LOWEST common level
vMotion all VMs off ESX05 to older hosts.
Put ESX05 into maintenance mode in vCenter
Install ESXi 6.5 on this host
Re-add ESX05 to vCenter if needed.
Move ESX05 into the compatibility cluster while it is in maintenance mode with no VMs.
Configure and thoroughly test ESX05 (see topic below).
Take ESX05 out of maintenance mode
vMotion some VMs onto ESX05, in preparation for upgrading ESX04 (the next lower generation server) next.
If you do this right, you should be able to avoid customer impacting downtime.
Problem: Did you miss the CPU compatibility fix and already vMotioned some VMs into an upgraded, newer host?
Sorry. You are stuck with a situation where you can’t get your last host(s) into the compatibility cluster because you have live VMs on it and you can’t vMotion the VMs to any other host. This is not an acceptable stopping point because you lose cluster benefits like DRS and also can’t vMotion for regular maintenance in the future. So bite the bullet and fix it now, rather than wait until you are forced to do it in the future.
If you get stuck in this compatibility hell, then the easiest solution is to shut down all the VMs on that host then move the host into the cluster. This normally results in a downtime of about 10-15 minutes, depending on how fast your VMs boot up.
Problem: Did you upgrade the host with vCenter on it, and now you can’t migrate without shutting down vCenter?
How to fix vCenter vMotion CPU compatibility issue:
Here is the situation. You are trying to vMotion your vCenter to another host, but you get an error about CPU compatibility. Errors like “The virtual machine requires hardware features that are unsupported or disabled on the target host” “If possible, use a cluster with Enhanced vMotion Compatibility (EVC) enabled; see KB article 1003212″ ” CPUID details” “incompatibility at level 0x1 register ‘ecx'”. “FMA3 is unsupported” “MOVBE is unsupported” “RDRAND is unsupported”
The normal fix is to power off the VM momentarily, vMotion it, then power it back on. During power-on, it will use the new host’s CPU capabilities.
But with vCenter, you can’t do this, because you are using vCenter to perform the vMotion, so powering it off means you can’t communicate with both hosts at once.
Shared storage fix:
If you have shared storage (both hosts can reach the same datastore), you can use VMWare’s instructions to fix the problem. Essentially, you make sure the vCenter server is on shared storage, then you connect to each host’s vSphere website directly. Power vCenter off and remove it from inventory (no delete!!!!) on the first host. Then Add vCenter to inventory on the second host and power it on.
No shared storage? Using local disk / datastore for each host?
This is how I’ve fixed it.
Using vCenter, with vCenter powered on, I right-click the existing vCenter server and Clone it to the second host’s datastore. Note: Name the clone something you are happy to use permanently)
Wait for the clone to finish, (the clone will be powered off).
Open the vCenter management website ( https://vcenterURL:5840 ) and log on to it
In another tab, open vSphere website to the second host (that has the clone) and log on to it.
Right-click the clone vCenter and Power On
Immediately Shut Down the original vCenter using the management website.
Wait for about 10 minutes, then attempt to connect to vCenter normally. You should be working from the clone now.
Once you feel comfortable, delete the old vCenter.
Something went wrong?? Rollback instructions:
If the clone vCenter doesn’t work, just shut it down using the second host’s vSphere website.
Connect to the first host’s vSphere website and power on the original vCenter.
You can avoid 99% of the risk by testing your upgraded host thoroughly before you put production VMs onto it.
I recommend the following tests (at minimum)
Make sure you’ve got your upgraded host configured, into vCenter, and into it’s destination cluster.
Using a test VM (build one up if you don’t have one ready), test connecting to each virtual switch and pinging to-and-from other servers across the network.
Storage vMotion the test VM to each major storage system you have.
vMotion (processing) the test VM between your upgraded host and other hosts. Test both directions.
Snapshot and delete snapshot on the test VM.
And before you close this project, make sure to re-connect your backup jobs and test them.
——————————–
Good luck in your upgrade process!
(shameless self promotion) By the way, I consult on VMware, Storage Area Networks (such as Netapp, Synology, FreeNAS), high availability designs, and migrations to the cloud. I offer 30 minutes of free technical advice on these topics: if we can solve your problems in that time, great! If the problem is too big, we can start working on a plan together. Please schedule using the button below! – Amira Armond, President, Kieri Solutions
“Two out of every five companies struck with a major disaster are unable to recover. Of the survivors, one third go out of business within the next two years. ”
— Gartner Study – 1996
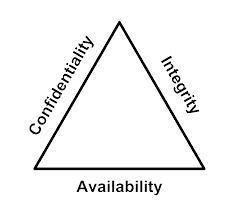
Availability and Integrity – why you need Business Continuity Plans and Disaster Recovery Plans.
Did you know that Information Security considers “Availability” and “Integrity” to be just as important as “Confidentiality”? If your IT systems go down or your data is lost, it will be just as serious for your business as if you were ‘hacked’.
Availability means “Your users can access your systems”. They are able to work. Without availability, you have nothing. Failover, redundancy, and quality systems design affects your availability.
Integrity means “You have data, and it is good data.” Some cyber-attackers focus on corrupting business data, then demand a “ransom” to restore it. If your data is destroyed, will you be able to perform work? Backups and segmenting your sensitive data from the rest of the network are big ways to improve integrity.
Confidentiality means “Only the right people are accessing your systems.” This is the focus of most cyber-security efforts, and ironically, has the least impact on whether your business can function.
Do you see how availability and integrity are just as important, or more important, than confidentiality? We focus on availability and integrity for this reason.
What are these plans for?
We write this plan to be used when you are having a very bad day.
– Amira Armond, President of Kieri Solutions
During normal times…
When there is no hurricane, these plans are used primarily to show that your business is being proactive about risks.
They are a required component of many cyber-security compliance frameworks and are required by law for some types of businesses, particularly medical providers.
Many businesses are asked by their customers to provide public-facing Business Continuity Plans (BCPs) to show that they are responsible partners and will be capable of operating in the future.
The process of writing a plan and reviewing it will make your business more resilient. Often we find issues such as missing backups, no identified alternative site, or lack of a communications plan. Before finalizing the plan, we will work with your team to fix these issues.
During emergencies…
When something goes horribly wrong, these plans are designed to help your staff respond appropriately, even if the lights are out.
The plan will remind you to do things like communicate with news organizations (depending on your business) or give contact information to reach your insurance company.
The plan will either have step-by-step instructions to perform recovery, or it will point you to the correct procedures document to use.
The best way to get management excited about a disaster plan is to burn down the building across the street. — Dan Erwin, Security Officer, Dow Chemical Co.
What is the difference between a Business Continuity Plan and a Disaster Recovery Plan?
Business Continuity Plans cover more aspects of your operations. Most IT compliance frameworks like HIPAA require a Business Continuity Plan, not a Disaster Recovery Plan.
The business continuity plan will include getting your critical information systems online, ideally through fail-over, but also focuses on how your employees will be able to continue providing services.
A business continuity plan addresses these topics:
Description of your business operations and critical IT systems
Identifies risks that can impact your ability to do business. If your business is considered critical infrastructure (such as a public utility or medical provider), we consider more risks. Each risk is evaluated for likelihood and impact. Examples include:
Pandemic (for critical infrastructure)
Regional disruption such as flooding or hurricane, which causes your employees to evacuate
Building disruption such as fire or power outage
Physical attacker or bomb threat (depending on type of business)
Information system disruption such as ransomware or cyber-attack
Identifies plans and procedures to continue operations during several scenarios. For example, a critical medical provider might coordinate with the police department and emergency medical services to set up temporary operations in a public space.
Communication plans for coordinating with internal employees, customers, and the public.
Contacts used during an emergency, such as police, hospitals, corporate insurance, and corporate attorneys.
Disaster Recovery Plans (DRPs) generally focus more on IT systems rather than overall business operations.
A disaster recovery plan addresses these topics:
Identify specific operations (normally IT systems) which are the focus.
Identify risks that impact your IT systems such as:
Specific system failures (such as a server crashing)
Server room disruption (fire, flooding, power outage)
Cyber-attack requiring rebuild of your IT systems
User error requiring recovery of data
Details about how your IT systems are backed up and procedures to perform backups and test these backups.
Plans for how to fail over operations, move to a new site, or recover your systems.
How much will downtime cost your business?
Check out this recovery calculator from Datto.com. Enter your variables (average employee salary, revenue, etc) to find out how much a critical system outage can cost your business.
I do not fear computers. I fear the lack of them. — Isaac Asimov
Stakeholders for your Business Continuity Plan
Why are we talking about stakeholders? Isn’t the IT guy responsible for disaster recovery? The answer is no. If you are leaving all responsibility on your IT person, you are being unfair to them. Making your business resilient takes C-level input because it is highly dependent on corporate strategy, goals, and budgeting.
Officers
Your corporate officers should identify how important IT systems are to the company. Can the business survive without them for a week? How about a day? Would it cause front-page news if customers couldn’t access their services? What about losing data? Could your company survive if the last 8 hours of changes to the data were lost? These questions are highly dependent on the company type. Amazon Web Services cannot afford to lose data or have even a few minutes of outage. A construction company might be able to absorb a few days of outage without their customer’s noticing.
Other departments
In larger companies, it is common for IT to maintain a server that they don’t know much about. The “marketing department uses it”. Without input from each department, you won’t know how critical a system is, and what level of continuity is needed. This feedback should go up the chain to the corporate officers for prioritization.
CIO
You also need a leadership role for your IT department, such as a CIO. This person understands how much your IT department can do, and what it should be doing. For example, it is entirely possible for a 100 person company to operate with just one (fast) IT person. But if life get hectic, the first thing to fall through the cracks are the preventative tasks and maintenance. Things like installing security patches, using processes to control system changes and document configurations, and backing up systems. Your CIO can add staff, bring in consultants, or prioritize tasks to make sure that prevention work happens. In addition, your CIO should schedule irregular tasks like testing backups, performing failovers, and running incident response drills. If leadership doesn’t champion drills and testing, they tend to be forgotten.
IT Department
Finally, we get to the IT staff. They do most of the heavy lifting; engineering and designing solutions to meet the corporate goals. They are responsible for making sure that each system has a recovery plan, and updating it over time. They should also periodically (quarterly or monthly) attempt to use these recovery procedures. Your IT staff are responsible for making sure that the design and procedures are realistic. Without this sanity check, a disaster recovery plan is much less effective.
Why choose Kieri Solutions to write your plan?
We are local to businesses in DC, Frederick, Baltimore. Rockville, Gaithersburg, and Columbia MD.
We think that Business Continuity Plans and Disaster Recovery Plans should be more than a piece of paper. Your Disaster Recovery Plan should have detailed procedures to follow to get your operations running again. Your Business Continuity Plan should have insurance policy numbers, contact information for your vendors, communications templates, and a well thought out risk assessment and response to a large number of possible incidents.
We research, train, prepare, and test the ability to recover from the unexpected.
Our staff just came back from a Cyber War Training event in North Virginia. Our employees have been doing DoD-level disaster recovery and fail over (they call it “Continuity Of Operations”) planning, testing, and support since 2005. In our careers, we have coordinated enterprise fail-overs, recovered hundreds of failed servers, and designed secure military networks to handle infrastructure attacks automatically.
We will suggest improvements
If there are glaring problems such as the backups are not enabled, or certain technologies are known to fail often, or if the proposed response to an incident would not be effective, we will give you a heads up. If you want help, we can help implement most fixes. For example, while writing recent a BCP, we discovered that two critical systems were not encrypted per HIPAA requirements, and one system wasn’t being backed up. We worked with company engineers to fix the problems before finalizing the BCP.
How does the DR / BCP process work?
A systems architect who specializes in ‘Resilient IT’ will be assigned to your business.
There will be an initial call with your management to identify the scope of the plan (for example, do you only want to focus on one critical system, or all business operations?). We will also work with management to identify key service levels such as the amount of time a system can be down and how much data can be lost.
We will brainstorm a list of possible business impacts (such as hardware failure, flood, cyber incident, and more). This helps guide the questions later.
There will be several calls, in-person visits, or screen shares with your technical experts to gather data about how the system is designed, how it is backed up, and what failover or redundancies are configured. We will also talk through various scenarios to see how the company would respond.
We will research the risk of each type of incident. For example, we might check flood histories in your area or research the failure rate of your network devices. We will also make architectural diagram(s) to show critical systems and dependencies for your operations to continue.
Through this process, we will be drafting a business continuity or disaster recovery plan. The next step is normally identifying exact procedures to recover operations. Your IT staff might provide these procedures, we might research vendor documentation to find them, or we might work with your IT staff to discover the best method.
Around now, your BCP or DRP is version 1.0.
We highly recommend testing the procedures and other information in the plan (such as contact numbers for your vendors) as soon as possible. Invariably, testing will identify missing steps or faulty equipment. The easiest form of testing is called a “tabletop exercise”. This is where we run a scenario and talk through each step. For example, we might move from discovery of a problem (who do you report it to?), to pulling in experts (internal and external), walking through how we would notify clients, and calling the insurance company.
If you are willing, we will work with your system administrators to perform test fail-overs and restores from backup. If gaps are found, we will help you solve them, either by updating the procedures or re-engineering systems.
Schrodinger’s Backup: “The condition of any backup is unknown until a restore is attempted.”
Tip: Put ‘real’ information in your plan.
This is information that is used if something really goes wrong (such as insurance policy information or procedures to restore from backup). You may want to create a second, public-facing plan which has sensitive information removed. This public facing plan can be provided to your clients to prove that your company is being responsible and diligent.
You will want to have copies of your plan printed out at multiple locations. If you can’t get to the office, the plan will help you contact vendors and insurance. It will remind you to do things like communicate with your customers or news organizations. And it will guide you in recovery procedures when things have gone wrong.
We have the experience with databases, cloud, virtualization, backups, SAN, networking, server hardware, and other technologies used by your business.
Kieri Solutions is at our heart a systems engineering company. We are used to designing and implementing solutions for real companies that want Resilient IT. So when we talk to your IT staff, it will be peer-to-peer, not a disappointing process of trying to explain concepts to a non-technical person.
We are local, and will be available to support in the future.
When you fly in a consultant from a big name company, you will probably never meet that person again. In contrast, once we have performed a project for you, we stand by our work and will respond if you have problems later on. We will also remember you and your network – you won’t be starting from scratch with us.
Our rates are typically half that of a big-name company.
Since we don’t need to fly our employees around, and because we have a smaller footprint, we don’t need to charge crazy rates. We will be glad to give you a no-risk estimate.R
Write HIPAA-compliant business continuity plans for medical providers.
Install Veeam Backup & Restore suite for VMware and Windows servers. Train staff to recover from various scenarios (file-level restore, server-level restore).
Design disaster recovery site and test ability to quickly recover from Ransomware and other scenarios.
Use Netapp SnapRestore and Snapshot technology to recover large (4TB+) virtual machines in 1-2 minutes.
Identify missing backups and lack of redundancy during SaaS business continuity planning, work with engineers to resolve before finishing BCP.
Configure and successfully test cloud restores using Datto and Office 365.
Create Continuity Of Operations Plans (COOP) (DoD specific disaster recovery plan) for US Navy deployed hospital systems.
We install and configure Netapp Disk Shelves and VMWare vCenter and ESXi for small and medium businesses in Maryland and DC.
(more about VMWare and virtualization later in this article!)
Netapp installation, integration, and maintenance
Kieri Solutions endorses Netapp products because they are designed to be highly available and have several options for nearly instantaneous data recovery.
We think Netapp snapshot technology is incredible. When used in combination with VMWare virtual machines, the snapshots can back up servers at any frequency (seconds, minutes, hours, and days) with minimal storage use. Recovery is as fast as a mouse-click. With our procedures, testing, and best-practice configurations, you can restore your failed server within a minute.
In our experience, de-duplication storage savings are between 50% and 80%. This means more data per disk, automatically. And the performance is excellent. Our clients typically have < 2 ms disk access rates, which is well below the 10ms “noticable” latency benchmark.
We have experience setting up SnapMirror and SnapVault to perform replication for disaster recovery. These technologies automatically transfer system snapshots to other Netapps, either at the same site, or remote.
VMWare upgrades, maintenance, and support
Kieri Solutions staff have been managing VMWare upgrades, installs, support, and maintenance since 2008.
We are experts at migrating to vCenter and vSphere ESXi 5.5 , 6.0, 6.5, and 6.7. We have performed many upgrades and have the process well tested and documented.
vCenter and vSphere 5.5 are END OF LIFE.
VMWare is no longer supporting them.
It is time to upgrade to 6.5 or 6.7!
We integrate VMWare and related technologies in the DC and Maryland area
Other SAN and NAS solutions such as Synology, Windows NAS, hyperconverged storage, vSAN, HP 3PAR, HP StoreOnce, Dell EMC
Veeam Backup and Restore
HP, Dell, Fujitsu servers
We combine SAN skills with expert VMWare knowledge
If you are using VMWare, you should make sure your SAN consultant understands how to connect the systems together.
SAN configurations and provisioning is extremely risky to operations. Performing the wrong action in either VMWare datastore setup or in the SAN management can cause a loss of data.
We have a proven track record of adding, maintaining, and troubleshooting VMWare datastores of all technologies such as Fibre Channel, Windows-based NAS, hyper-converge, vSAN, and iSCSI.
While we are upgrading your storage (making all your virtual servers much faster and giving them breathing room), we can also upgrade your vCenter and vSphere servers to 6.5 or 6.7, or upgrade your server hardware. If you are still operating on 1gbps network links in your data center, a very cost-effective project is upgrading the network links to 10gbps between your hosts and storage. This removes the most common bottleneck for virtual servers and can increase performance by 500%.
Why choose us to install or configure your servers or SAN?
We have the experience with VMWare and other virtualization technologies (HYPER-V, etc) needed to design and integrate your full solution.
Before considering a big-name install, make sure you ask whether they will connect your data switch to your hosts, create volumes, connect them to vCenter, migrate your virtual machines, and verify the recovery options are functional. Most install packages offered by big-name companies only include generic installation steps like racking and assigning a few network addresses. They leave the risky steps to your staff.
In comparison, Kieri Solutions will work with you to create a detailed plan to reach the end-goal. We will schedule any planned or potential downtime with you to reduce user impact. If you have a change management process, we will follow it – if you don’t, we still go through the common sense steps of risk management, documentation, and communication. Once the project is complete, we will provide configuration management information and training so that you have full control of your own system.
We are local, and will be available to support in the future.
When you fly in a consultant from a big name company, you will probably never meet that person again. In contrast, once we have performed a project for you, we stand by our work and will respond if you have problems later on. We will also remember you and your network – you won’t be starting from scratch with us.
Our rates are typically half that of a big-name company.
Since we don’t need to fly our employees around, and because we have a smaller footprint, we don’t need to charge crazy rates. We will be glad to give you a no-risk estimate.
Recent Netapp and VMWare projects near Columbia MD, Baltimore, Rockville MD, Gaithersburg, DC, Frederick, and Columbia MD
Physical to Virtual (P2V) migration of SAGE accounting server to VMware.
Migration of virtual machines from Linux KVM (a free virtualization product) to VMWare vCenter and vSphere.
Linux KVM to VMWare migration of 20+ servers.
Install security patches, firmware, and operating system configurations to mitigate SPECTRE / MELTDOWN L1 vulnerabilities.
Engineered and built multiple enterprise-class vCenter, vSphere and NSX clusters with fiber channel storage switches, VLANs, distributed virtual switches, high security design (military), and Netapp SAN with multi-site failover.
Set up disaster recovery best practices using Netapp. Test ability to recover virtual machines using SnapRestore within 1-2 minutes.
vCenter and vSphere ESXi upgrades from 5.5 to 6.5 and 6.7
Install Netapp AFF8080 as the core storage for a VMWare datacenter running 40+ virtual servers and Virtual Desktop Infrastructure with Horizon View. Also built the VMWare datacenter and NSX infrastructure as part of this project.
Install Netapp FAS2554 filers as secondary (on site) and tertiary (off-site) recovery using SnapMirror and SnapVault technology.
Install Netapp FAS2552 filer. Install new 10gbs network to replace low-performance 1gbps links. Upgraded hosts, network switches, and VMware as part of this project. Migrated virtual machines to Netapp storage, decreasing disk latency from ~150ms to ~2ms.
Upgrade / refresh server hardware used for VMWare and Microsoft’s Hyper-V
Maintenance and support for Netapp products, including disk replacement, firmware upgrades, creating storage containers, and monitoring disk use.
Install Netapp DS2446 disk shelf for additional storage, connect to VMWare hosts, load-balance VMs, and set up snapshot recovery procedures for instant VM restores.
Training for in-house staff on how to perform Netapp tasks such as provisioning storage for a new VM, performing health checks, and emergency restores.
Installation of Veeam Availability Suite and creation of disaster recovery site using HP StoreOnce and HP 3PAR SAN.
Training for in-house staff on how to maintain their VMWare systems. Proper use and the dangers of VMware snapshots, performing health and performance checks, and migrating / failover for hardware maintenance.
Disaster recovery of a failed HYPER-V 2012 server and guest VMs.
Backup and disaster recovery preparation for HYPER-V
If your business deals with the personal information of EU citizens, or you are not sure if GDPR applies, you should come!
On May 25, 2018, new legislation aimed at giving individuals more control and protection over their personal data –theGeneral Data Protection Regulation (GDPR) – went into effect. Is your business ready for the GDPR? Join this seminar to determine what a business owner (even a large business) needs to know about GDPR. Determine if it is applicable to your business, and it if it does, what do you need to know, and next steps.
With GDPR moving into enforcement this month, many businesses in the United States are scrambling to perform damage control.
Human Resources has unique concerns about GDPR
– Do I need consent to collect personal information about our employees?
– Are there extra steps required before providing employee information to outside benefits companies?
– Are things like external contact lists even allowed anymore?
– What are HR’s responsibilities for protecting personal information?
– What do I do if an employee wants me to “delete their data”?
– What is an appropriate GDPR training program for our employees?
If your business sells product in the European Union, has employees in the European Union, or collects data from European Union citizens, you may be at risk of huge fines from non-compliance.
If you are concerned about GDPR compliance, I recommend the next steps:
Check with C-level management to determine whether anyone (normally the IT department) is already taking the lead. If they are, make sure to provide information about HR’s use of personal data, especially any transfers outside the company.
Start a gap analysis. This involves two experts: a systems architect to map out your information systems and data flows; and a GDPR-specialized lawyer to determine whether your processes are allowable, and whether your legal contracts with vendors are solid. The gap analysis will give you a list of prioritized actions necessary to comply with GDPR.
Begin compliance projects.
Request a demo of this course: GDPR for United States Employeesby Native Intelligence, Inc. I worked with Native Intelligence to create this fun and informative course. It teaches specific skills and procedures to your front-line employees for compliance with GDPR. And it is a good overview if you want to learn about the topic yourself.
Rights of the Data Subject: GDPR for United States Employees training course by Native Intelligence, Inc.
The European Union will be looking to make examples of some companies over the next year. If you can show that your company is actively trying to comply with the law, you will be on much better footing than other potential targets.
Regarding hiring Kieri Solutions, GDPR consultant near Frederick MD, for help
There is a huge amount of demand by companies right now for GDPR assistance. I am happy to speak with you about whether GDPR applies to your company, and to what extent. A very brief gap analysis takes about two weeks. A more in-depth gap analysis can take six weeks or longer (if your business is complex). If you want to go forward with a gap analysis, I will need to schedule it out so that our lawyer and systems architect are available. I can be reached at the contact info below. Thank you,
V. Amira Armond
“Resilient IT”
A Woman-Owned Small Business serving Frederick MD, Baltimore MD, and nearby cities.
You buy a brand new computer and things are great! You can browse the web at speed. Programs open and close when you ask. Life is good.
Then time goes by – maybe a year. You’ve accidentally opened some sketchy websites (clicking links on Facebook is more dangerous than you thought!).
The antivirus that came with your computer is flashing expired warnings. A teenager used it. You installed a “Java update”… is that a thing? After all that abuse, your computer is now acting possessed and you are beginning to hate the thing.
You don’t need to buy a new computer for $1000. If it has been two years or less, your hardware should still be plenty fast. You just need to get the software refreshed. This can be done by performing a computer tune-up, or by reinstalling Windows fresh.
A tune-up removes bad programs like viruses, spyware, and advertising programs from your PC. It also tells good programs to stop running in the background – these background programs are a major cause of slowness.
Re-installing Windows fresh gives you the new computer experience. You will need to re-install your programs and re-connect your printer. A skilled technician can back-up and restore your data to the computer so you don’t lose any pictures or documents.
If you would like professional help getting your computer back to full speed, give us a call: (301) 253-5150
I’ve long said that every big-name company has been hacked; they just haven’t disclosed it yet. This is just common sense. In even a single computer, there are thousands of cyber attack vectors and known vulnerabilities. Once you grow to 10,000+ employees, multiple sites, and custom business applications, the amount of risk becomes unmanageable. Even with full time cyber-security departments, I’ve never seen any network secure more than 95% of their known vulnerabilities at any given time.
Then you add the undisclosed vulnerabilities, which professional hackers collect like shiny baubles, and basically any enterprise network can be hacked.
Bottom line:
Your personal information; my personal information; everyone’s personal information is available for sale on the dark web. If you aren’t a victim yet, credit a limited number of criminals, not best practices.
Credit freeze options
If you don’t plan on opening a new credit account soon, consider placing a credit freeze on yourself for each of the four agencies. Transunion, Equifax, Experian, and Innovis.
The credit freeze makes it impossible for companies (like banks) to look up your credit score. Generally, if a company can’t see your credit score, they won’t open a new credit account. This protects you against the classic credit-theft attack: opening a new credit card or loan in your name, spending the balance, then leaving you with the bills.
If you apply for a credit freeze, then want to open a new legitimate account, you can still do this – but you will need to contact the credit agency and ask for a temporary un-freeze. Both the freeze and un-freeze can cost money, depending on what state you live in. (States have legislated that the credit agencies MUST offer this service, or else they wouldn’t, and as part of the legislation, a fee was specified. In Maryland, it is $5). It can take a day or two to un-freeze your account.
What about the theft of my credit card number?
A credit freeze will not protect you against having your credit card number stolen and used for purchases. Your bank is already trying to protect you against this by issuing new cards when it detects strange activity. You should also check your monthly statement and protest any charge that you don’t recognize.
How do I request credit freezes?
Navigate to each of the credit agencies (helpful links below) and go through their process to request a freeze. When I tried it today, only one agency (TransUnion) required me to pay the $5 fee. Kudos to the rest for being ?responsible? (this is hard for me to say… I feel great anger toward these agencies since they have used our data without permission and only introduced consumer safeguards when forced to by laws).
Alright folks, this is a technical topic, but I’m going to try to explain it simply. Bear with me!
If your organization has more than five servers, you are probably using a virtualization system like VMWare or Microsoft’s HyperV. These systems give huge benefits in terms of high-availability, disaster recovery, and management ability. But if they aren’t designed well, they tend to have resource problems.
All computer systems have four basic types of resources available to them which affect their performance.
These are kind of like muscles in a body. If your tasks are too hard for the muscle, it won’t be able to keep up with the work. And if one set of muscles is overwhelmed (think of trying to swim with a weak arm), everything suffers. The four basic resources are processor speed (CPU), fast memory (RAM), slow memory (hard disk), and network.
Most system administrators know all about processor speed and fast memory. They know not to over-allocate the CPU or RAM. There are clear views of exactly how much CPU and RAM you have and how much is being used, so they can see their usage.
But the hard drive – the slow memory – only displays capacity in terms of storage space – 400 GB used out of 1 TB.
Left out of the view is data transmission speed – which is made of two pieces… the communication path between your processor and the storage, and the speed of accessing the data itself. This transmission speed is often the piece that degrades first when you have multiple virtual machines using it.
The rule of thumb is that you want the average transmission (both the read or write from the storage, as well as the network path to the processor) to take less than 10 milliseconds. Personally, I aim for 3 milliseconds in a smoothly functioning system.
Once you start seeing 50 ms, 100 ms, or more, the virtual machines will be obviously “slow”
If you are running more than a handful of virtual machines, you will definitely need a professional Storage Area Network (SAN) solution such as Netapp, EMC, vSAN, or Hyperconverged Infrastructure. This will increase the speed of accessing the data itself. In addition, you need a fast communication path, AKA network. These days, that communication path is a high speed storage switch such as Brocade or Cisco with matching high speed network cables. iSCSI can run at speeds of 10gbps or 40gbps ethernet. Fibre Channel can run at speeds of 8gbps, 16gbps, or faster. 1gbps Ethernet is not fast enough to handle multiple virtual machines – you need to look at 10gbps if this is your situation.
In summary, if your virtual machines are SLOW, check the disk transmission (latency) performance.
This is often the main bottleneck. Specific performance measures are disk read latency, disk write latency, disk read i/o, disk write i/o. Isolate the bottleneck to either the storage device, or to your network. Then upgrade the one (or both) that is causing the most pain. Most medium sized businesses are fixed by upgrading to a professional SAN and installing dedicated 10gbps switches for the communication path.
As always, if you are near the Frederick MD, Baltimore MD, or Northern DC suburbs, I can help you with this upgrade. Give Kieri Solutions a call!
What is the first rule of computer troubleshooting?
Unlike a regular desktop computer, when laptops “freeze up”, it is not obvious how to do this! Even if you pull out the cord, the laptop may just fall asleep and wake up exactly the same. Or maybe it will slowly drain the battery for three hours while you pace in circles.
There are two ways to forcefully power off a laptop.
The first method is to hold down the power button for 4 seconds.
The four-second press is a special technique that is built into all computers and laptops for emergency power off. If nothing happens for 3 seconds, then your computer abruptly turns off, you did it! Power it back on by tapping the power button and your computer should boot back up from scratch.
If your computer immediately starts sleep mode, or hibernation mode, you will need to wake it back up (by pressing the power button) and try the second method.
Second method: Pull the battery out.
Flip your laptop upside down and look on the back for a compartment that has two “lock/unlock” icons that can be released by hand.
This is your battery compartment. Pull the releases apart and your battery will disconnect slightly- this should be enough to power off your laptop. Then push the battery back in and tap the power button to boot up from scratch.
Hopefully at this point your frozen laptop is back to normal! If not, give us a call for assistance: (301) 253-5150